Published by FindMyMarathon.com
May 21, 2025
 The Rock 'n' Roll San Diego Marathon, a vibrant and energetic race through the heart of "America's Finest City," offers a unique blend of urban scenery, enthusiastic crowds, and challenging terrain. Known for its lively atmosphere and on-course entertainment, this marathon presents a different profile than many others. Understanding the course's nuances and developing a smart pacing strategy are crucial for a successful and enjoyable race experience.
Though not considered a flat-and-fast course, it offers a modest net elevation loss of 240 feet, and with the right pacing strategy, it can be an opportunity for a personal best or even a Boston Qualifier. This guide will equip you with the knowledge to navigate the course effectively and craft a pacing plan tailored to your goals.
Start Location: Just outside Balboa Park on 6th Ave. & Quince
Finish Location: Ash Street & Union Street (Downtown San Diego)
Elevation Change: Net elevation loss of approximately 240 feet from start to finish
Course Type: Point-to-point
Certified: Yes (Boston Qualifier & World Marathon Majors Qualifier)
Typical Weather: Low 60s°F at the start; rising to mid to high 60s by the finish
Boston Qualifying Rate: Approximately 4%

The Rock 'n' Roll San Diego Marathon demands a strategic approach to pacing, considering its early hills and gradual descent towards the finish. A conservative start and an even-effort strategy, or a slight negative split, are generally recommended to conserve energy for the later stages of the race.
To formulate your ideal pacing strategy, it's essential to break down the course into key segments, understanding their characteristics and the demands they place on your body:
Terrain: Rolling with gradual uphill early
Elevation Change: +110 feet over the first 4 miles, then gentle rollers
Key Features: Balboa Park, University Heights, cheering spectators
The race kicks off just outside Balboa Park, with a steady climb in the opening miles as runners head north through the streets of the Hillcrest, North Park and Normal Heights neighborhoods. The early hills are manageable, but noticeable—especially if you start too aggressively.
Pacing Strategy: Start conservatively. Run slower than goal pace through Mile 2.5 to account for the gradual climb. Focus on effort, not pace. Once you crest the hill near Mile 4, settle into a relaxed rhythm and let the flatter terrain help you find your stride. It's crucial to avoid going out too fast here, as expending too much energy on the early inclines can have negative consequences later.
Terrain: Gradual downhill with some rolling hills
Elevation Change: Net downhill (-150 feet)
Key Features: Transition through diverse residential areas
This segment is a fast portion of the course. From Normal Heights, retracing your steps through diverse neighborhoods, and on towards the Old Town San Diego area, the route drops steadily with only a few uphills, offering a great opportunity to lock into your goal pace without overexerting. The course passes through lively neighborhoods and transitions to the flat stretches near Mission Bay after dropping 240 feet during the one mile stretch from mile 12.5 to 13.5. While the few climbs are not as significant as the initial ascent, they can still accumulate and impact your energy levels if you're not mindful of your effort.
Pacing Strategy: Aim to gradually settle into your planned marathon pace during this section. On the uphill portions, maintain an even effort, allowing your pace to naturally slow slightly. Utilize the downhill sections to recover, but avoid overstriding or significantly increasing your speed to compensate for lost time. Let gravity work for you. Focus on keeping your cadence steady and stay relaxed. These are your "cruise control" miles. If you're feeling good, maintain your planned pace. If you encounter a challenging hill, ease off slightly to conserve energy.
Terrain: Flat to very gently rolling
Elevation Change: Minimal net change
Key Features: Mission Bay Park, waterfront views, quieter sections
The course flattens out significantly in the Mission Bay area, circling around the park with long, straight sections. These miles are scenic but can become mentally challenging, especially with lighter spectator presence. Exposure to sun and headwinds off the bay can also play a factor.
Pacing Strategy: Maintain your goal pace but begin to monitor effort more closely. Stay relaxed, stay fueled, and stay mentally engaged. Don’t zone out—this is where many runners begin to feel fatigue set in. Use landmarks and aid stations as checkpoints to stay motivated. If you're aiming for a negative split, this is a good section to gradually increase your pace, but do so conservatively and listen to your body.
Terrain: Significant uphill
Elevation Change: +230 feet in 1 mile
Key Features: Quieter industrial zone on Hwy 163
This is the most challenging part of the course. After a long mostly flat stretch, runners are hit with a sharp climb beginning around Mile 22.5 up Highway 163. The incline is steep and sustained, rising roughly 230 feet over the next mile. It’s a true late-race test of strength and pacing discipline.
Pacing Strategy: Shift to a "maintain effort" mindset. Slow your pace, shorten your stride, and keep your breathing steady. Trying to power up the hill at goal pace can be a costly mistake. Accept the slower pace and focus on cresting the hill without spiking your heart rate. Conserve what you can for the final push. This is not the time to be a hero and power up the hill.

Terrain: Gradual downhill, then flat to finish
Elevation Change: -220 feet net from Mile 23.5 to finish
Key Features: Downtown San Diego, city streets, cheering spectators
After conquering the final test, you’re rewarded with a long descent back into downtown as the course drops more than 200 feet towards the finish. The downhill helps ease tired legs, and the finish near Ash & Union delivers a fast final stretch with solid crowd support.
Pacing Strategy: If you have anything left, this is the place to use it. Use the downhill to pick up momentum and carry you into the city. Don’t overstride—focus on quick feet and maintaining control. Once you hit the flatter areas, visualize the finish and push with everything you’ve got.
The Rock ‘n’ Roll San Diego Marathon is a vibrant, challenging course that rewards disciplined pacing. The net downhill profile is helpful, but is at the cost of having some uphills. The key to success lies in running the early hills conservatively, managing your effort through the Mission Bay flatlands, and preparing mentally and physically for the Hwy 163 climb. Pace with patience, run with intention, and you’ll set yourself up for a strong finish downtown.
Q: What kind of weather can I expect at the Rock 'n' Roll San Diego Marathon?
A: The race typically takes place in the first week of June. You can generally expect morning temperatures in the low 60s (°F), rising into the mid to high 60s by the finish. Stay on top of the race forecast and historical weather on FindMyMarathon.com's Race Detail page for the Rock 'n' Roll San Diego Marathon.
Q: What pacing strategy should I use to achieve my goal time at the Rock 'n' Roll San Diego Marathon?

A: Given the early hills and challenge of a significant hill late in the race, a Conservative Start followed by an Even Effort or a slight Negative Split strategy is generally recommended. Avoid starting too fast on the initial climb. Focus on maintaining a consistent effort through the rolling hills and then gradually utilizing the downhill sections in the later half of the race.
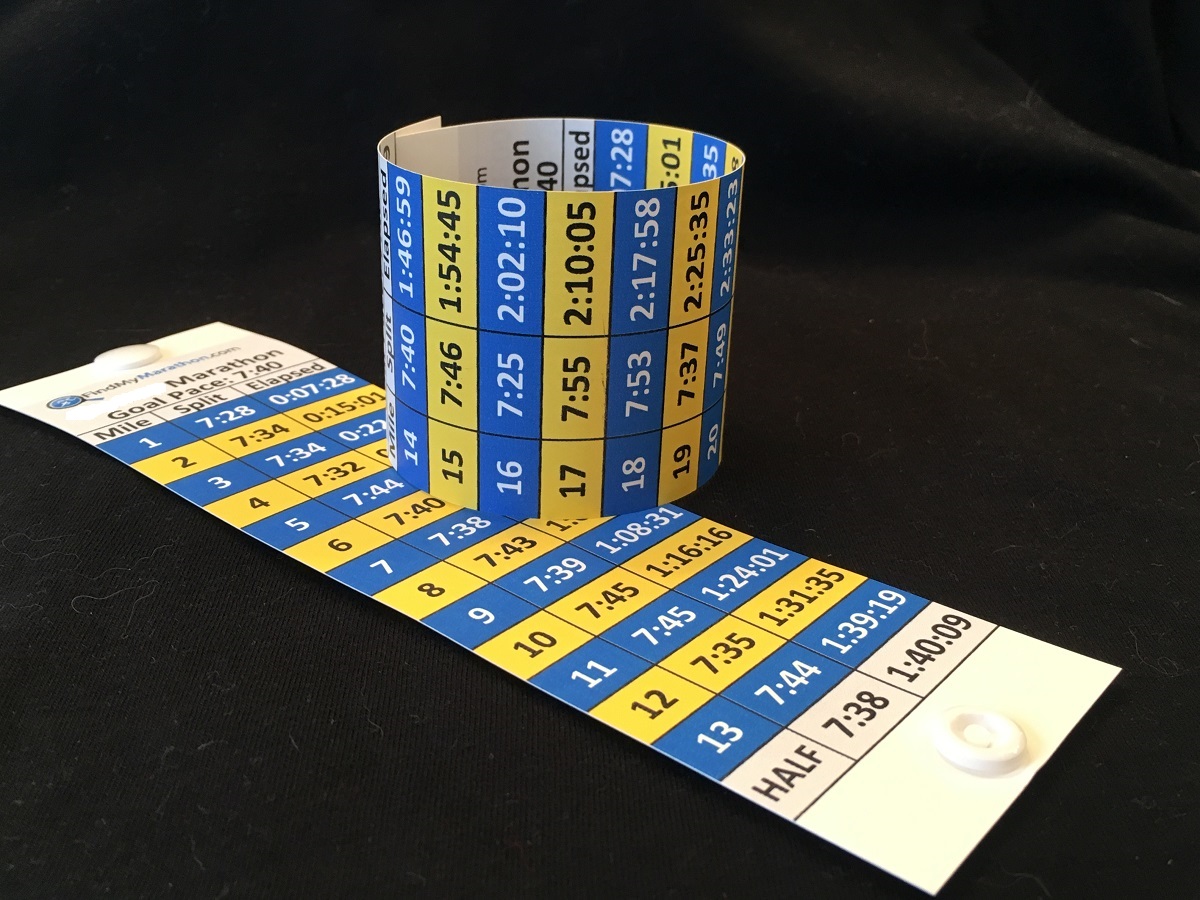
Creating a personalized Pace Band tailored specifically for the unique profile of the Rock 'n' Roll San Diego course and your goal time can be a valuable tool.
Q: Is the Rock 'n' Roll San Diego a good race to qualify for the Boston Marathon?
A: It can be. With a net downhill profile and typically mild weather, runners who manage the late hills well can run fast times. The BQ rate is below average (~4%), but smart pacing makes it possible for runners qualify for Boston on the challenging course.
